
Last Updated on October 13, 2026 by Giorgia Guazzarotti

Oil cleansing method? Say what?! I can’t believe people cleanse their skin with oils now. That’s nuts. Like, my t-zone is already as shiny as a frying pan, and you want me to add even more oil?! To say that I was sceptical about the oil cleansing method would be an understatement. But when I summoned enough courage to try it, something unexpected happened.
My skin started glowing. It became silky soft to the touch. And, nope there was not a single pimple in sight. Instant convert right there. The oil cleansing method IS a game changer. If you haven’t taken the plunge yet, here’s what you should make the switch from traditional facial cleansers right now:
- What Is The Oil Cleansing Method, And How Does It Work?
- How Does The Oil Cleansing Method Benefits Skin?
- How Do You Use The Oil Cleansing Method?
- What Are The Best Oils For The Oil Cleansing Method (Based On Your Skin Type)?
- The Best Oil Cleansing Method Recipes For Beginners
- Is The Oil Cleansing Method Safe For Acne And All Other Skin Types?
- Oil Cleansing Method: FAQ
- The Bottom Line
What Is The Oil Cleansing Method, And How Does It Work?
The oil cleansing method (OCM) uses natural oils to cleanse your skin. It works because like attracts like. Basically, your makeup has oil. Your face produces oil. The impurities comfortably lodged in your pores are oily. Castor oil and co act like a magnet, attracting all that oil-based gunk and taking it on a journey down the drain.
FYI, oil cleansing ain’t nothing new. If you take a quick look at your fave cleanser, chances are a few oils have sneaked their way in there. That’s what makes them work so well. In these cleansers, oils are joined by surfactants, a group of ingredients that helps them mix with water to remove dirt and grime faster. Surfactants are also the reason these cleansers (unlike natural oils) leave no greasy residue behind.
If you’re already using an oil-based cleanser, you’re already on the oil cleansing method bandwagon. Feel free to stick with it. But if you want to go down the natural route or make your own DIY cleanser, keep reading on. I’ll show you how to do it:
Struggling to put together a skincare routine that minimises wrinkles, prevents premature aging, and gives your complexion a youthful glow? Download your FREE “Best Anti-Aging Skincare Routine” to get started (it features product recommendations + right application order):
How Does The Oil Cleansing Method Benefits Skin?
Several ways:
- It dissolves even the most stubborn of makeup effortlessly: That’s oil-based, and like attracts like, remember? Even waterproof mascara is no match for it.
- It doesn’t dry out the skin: You’re replenishing oil as you’re stripping it away.
- Oils are moisturizing: They leave your skin so soft, and increase hydration, so you may find, you don’t need a moisturizer afterwards.
How Do You Use The Oil Cleansing Method?
Let’s start with the oil cleansing ingredients you need: just some oils and a warm towel or damp washcloth. Make sure you use a clean washcloth every time. Wet washcloths harbour bacteria that can cause all sorts of infections, completely defeating the point.
FYI, you don’t need to use the oil cleansing method in the morning. Unless you went to sleep with your makeup on. *tut tut*. The oil cleansing method works best for removing stubborn makeup and sunscreen, not the few impurities that have settled on your skin during the night. Don’t waste your oils! So, how do you do it?
Step 1: Mix the oils together, either in the palm of your hand or in a small bottle.
Step 2: Massage the mixture on your dry face for a few minutes to remove makeup and other impurities.
Step 3: Wet a washcloth with warm water and gently wipe your face with it.
Step 4: Repeat step 3 until you’ve wiped all the excess oil from your skin.
Step 5 (optional): Follow up with your regular cleanser to remove the oily residue left behind by the oil.
That’s it. Easy peasy, right?That’s it, really.

What Are The Best Oils For The Oil Cleansing Method (Based On Your Skin Type)?
I know, there are so many to choose from! And they all have different properties. Some cleanse better than others. A few are comedogenic, others aren’t. Some can even irritate your skin, while others are gentle enough for the most sensitive of skin types. The trick is to figure out what the best combination for your skin type is. But how the heck do you do that?! Experiment. Try a few combinations and see what your skin likes best. Here are a few oils that are good for the oil cleansing method:
| OIL | BEST FOR | BENEFITS | DRAWBACKS |
|---|---|---|---|
| Argan oil | All skin types | Cleanses well and moisturises skin. | Expensive. |
| Castor oil | All skin types, when diluted | Excellent at removing makeup and impurities. Rich in moisturising ricinoleic acid. Has antibacterial properties that may help with acne symptoms. |
Can be drying, so mix it with other oils. |
| Coconut oil | Dry skin | Cleanses well and is very moisturising. It’s one of the best oils if you’re experiencing excessive dryness. | Can cause breakouts (including blackheads). |
| Jojoba oil | All skin types, especially oily | Cleanses and moisturises. Its wax esters give it a texture similar to your skin’s natural sebum, so it doesn’t clog pores. | Not everyone likes its sebum-like feel. |
| Mineral oil | Dry and sensitive skin | Excellent cleanser, very moisturising and gentle. Unlikely to irritate skin. | Very occlusive, may interfere with the absorption of products applied afterwards and may cause breakouts in acne-prone skin. Unlike natural oils, it contains no antioxidants. |
| Olive oil | Dry skin | Cleanses well and is very moisturising. | May cause breakouts. Some olive oils contain impurities or additives that may irritate skin. |
| Sunflower oil | All skin types | Cleanses well, moisturises and feels lightweight. Less occlusive than many other oils. | I have no complaints re this one. |
| Sweet almond oil | All skin types, especially oily | Cleanses well and moisturises skin. It’s very lightweight. | I have no complaints re this one. |
Related: How To Determine Your Skin Type + Free Test
PRO TIP: Don’t even think of buying your cleansing oil at the supermarket. The oils you use to cook won’t do. They usually contain extra stuff that you don’t want on your face. Instead, get yourself to a trusted natural shop and purchase the pure, organic, cold-pressed, kind of oil. If you’re going for olive oil, make sure it’s the extra virgin kind. If any oil is not cold-pressed or extra virgin, it means it’s been refined and has lost all its antioxidants and good nutrients.
So you’re read the list but don’t have the faintest idea where to start to create your own oil cleanser? I’ve got you covered:

The Best Oil Cleansing Method Recipes For Beginners
As a good Italian, I’m going to recommend you start experimenting with olive oil. I use it for everything and can’t sing its praises enough. I usually mix it with castor oil. It’s versatility makes it a good option. Now you’ve got your oils, let’s talk ratios. They vary depending on your skin type.
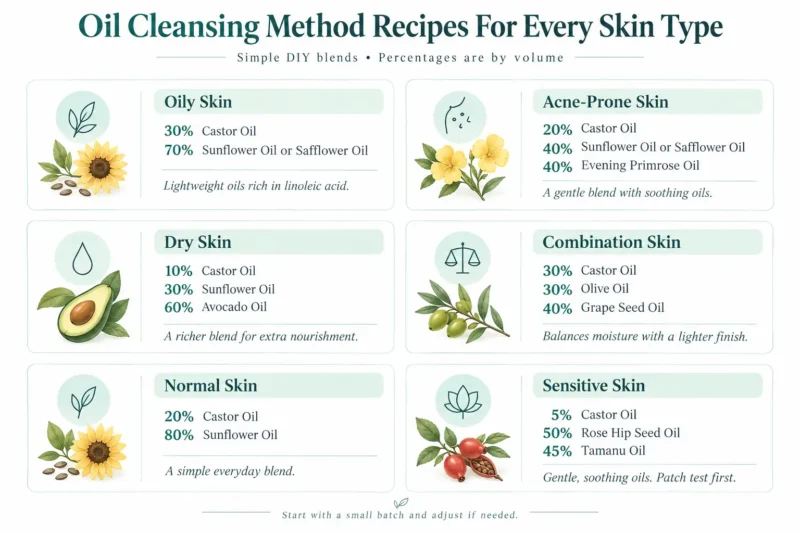
How much oil should you use? The percentages below tell you how much of each oil to add to your mixture. For example, if you’re making 10 ml of cleansing oil, 10% = 1 ml, 20% = 2 ml, and 30% = 3 ml. So, for the oily skin recipe below, you’d mix 3 ml of castor oil with 7 ml of sunflower or safflower oil. Easy peasy!
Oil Cleansing Recipe For Oily Skin:
- 30% Castor Oil
- 70% Sunflower Oil or Safflower Oil
Sunflower oil and safflower oil are rich in linoleic acid, a fatty acid that can reduce clogged pores.
Oil Cleansing Recipe For Acne-Prone Skin:
- 20% Castor Oil
- 40% Sunflower Oil or Safflower Oil
- 40% Evening Primrose Oil
Oil Cleansing Recipe For Dry Skin:
- 10% Castor Oil
- 30% Sunflower Oil
- 60% Avocado Oil
Avocado oil is a rich source of moisturizing fatty acids and antioxidants that can help repair skin.
Oil Cleansing Recipe For Combination Skin:
- 30% Castor Oil
- 30% Olive Oil
- 40% Grape Seed Oil
Oil Cleansing Recipe For Normal Skin:
- 20% Castor Oil
- 80% Sunflower Oil
Oil Cleansing Recipe For Sensitive Skin:
- 5% Castor Oil
- 50% Rose Hip Seed Oil
- 45% Tamanu Oil
Rosehip oil and tamanu oil are very gentle and soothing. But, always do a patch test before putting them on your skin!
This is just the most basic recipe to get you started. You can follow it to a T. Or add a third oil to the mix. Or use completely different oils. Start with the basics. When you’re comfortable, you can experiment with other oils and find out the best combination for your skin.
Is The Oil Cleansing Method Safe For Acne And All Other Skin Types?
Well, there are a couple of side effects…
- It can take time to find the right combination (and ratio) of oils for your skin type. Until you do, you may experience breakouts and, if your skin is sensitive, even irritation.
- It’s more time-consuming than regular cleansing (but, also more effective).
- You have to wash your washcloth often – that’s the boring part.
But, when you finally get the right combination of oils, all the hassle is more than worth it. Trust me on this one.
Oil Cleansing Method: FAQ
Can I oil cleanse if I have eyelash extensions, tattoos, or microbladed brows?
Yep, oil cleansing is generally chill for lash extensions, tattoos, and microbladed brows-but hold up. With lash extensions, avoid those oils right on the lash line or use an oil-free remover there (otherwise your expensive lashes might peace out early.) Same with fresh tattoos and new microblading-wait until they’re healed up, because you really don’t want to mess up the healing process or ink.
Does this method actually “purge” my skin or is that just a myth?
Okay, real talk: When people say your skin “purges” after oil cleansing, what they mean is your face might freak out for a week or two as the deep gunk finally gets evicted. You might get a few pimples in the beginning, but it’s not because oil is evil. It’s just all the deep-set junk getting flushed out. If you stick with it and don’t go totally overboard scrubbing or experimenting, it usually chills out after the “adjustment” phase. Here’s how to know if you’re purging and what to do about it.
Is facial massage during oil cleansing actually useful or is that just feel-good fluff?
Not just fluff! Massaging your face with oil isn’t just self-care propaganda; it helps boost blood flow, can support lymphatic drainage (less puffiness), and might even give you a little glow boost while breaking up stubborn gunk hiding in your pores. Just don’t get wild and aggressive-gentle circles, people! Bonus points if you know some pressure points.
Do You Need To Double Cleanse After Oil Cleansing?
Nope, not necessarily. If you’ve removed all the dirt, makeup, and sunscreen, and your skin feels clean, you’re good to go. But if there’s still a greasy residue hanging around, follow up with your regular water-based cleanser to get rid of it. That’s double cleansing, and it’s completely optional. The goal is clean skin, not washing your face twice just for the sake of it.
The Bottom Line
The oil cleansing method is time-consuming, but it’s a total game changer. It cleanses skin, it moisturizes it, and even makes it glow. You may get clearer skin too. Go on, give it a try.
i love oil cleansers because they clean the face without making it so tight and dry.
shu uemura’s cleansing oils are divine (but pricey) but i love DHC deep cleansing oils because it’s basically the same thing for 1/3 of the price.
i think people have to get over the fear and weirdness of “oh my god i’m putting oil on my face” to understand how it all works and just see for themselves. it really does emulsify and rinse completely away.
i remember having a reaction using the Olive oil, thus my experimenting days are okay xD
I use OCM before I do the facials to make sure my skin is clean. The mixture of oil is important, I use equal parts of castor, olive, and jojoba oils and mix them in a bottle. That way whenever I want to do an OCM, I have the mix ready.
As the author of The Healing Powers of Olive Oil, I have to say I love both ready-made olive oil beauty products and plain EVOO. Both work well from head to toe. Warning: You can get addicted to ready-made olive oil-based soaps, shampoos, gels, and conditioners.
Hmm this probably new thing to me. Sure, I know about Shu Uemura cleansing oil whatnot, but I just dont dare to use oil to remove my makeup. Guess water-based products suit my skin better. =)
If ppl are raving bout OCM over there, over here beautyholics are raving about BB cream.
Actually I tried this method yesterday and I think I like it! Very soft and smooth skin!
I use cleansing oils when I wear foundation, especially during the evenings when I’m out to dinner. First makeup remover, then cleansing oil, and finish with cleanser. Gotta make sure EVERYTHING comes off 🙂
Suzanne: I think your right. It’s a bit weid at first to put oils on your face and I think some people are scared they’re gonna cause breakouts. But they don’t. Once you get over the weirdness, you actually notice how good the results are.
Nic nic: I’m sorry it didn’t work for you. Maybe you can try jojoba or sunflower oil? Just make sure they’r suitable for your skin type and you shouldn’t have a reaction.
Dao: I never thought of putting it in a bottle, lol. Maybe that’s because I don’t do the OCM often due to lack of time although I really love it. The concentrations of oild are very imporant, you’re right and depend on your skin type. I usually use olive oil and 30% castor oil and this seems to work fine for me.
cal orey: thanks for your comment. I agree, olive oil has great moisturizers and antioxidant properties. It has always worked very well for me too.
Hanna_Hullabaloo: not all oils cause breakouts. jojoba oil for instance is non-comedogenic and neither is sunflower oils. The commercial ones like Shu Uemura, however, contains lots of chemicals so the chance of having a negative reaction are higher. But if water-based products work bst for you, there is no need to change.
OCM is very popular esp among people who are into natural, organic beauty and it’s always cheaper than buying commercial cleansing oils.
I’ve heard so many things about BB Creams but never tried one as they aren’t available here 🙁
my_makeup_mania: I’m glad you like it. It works great doesn’t it? I love how soft my skin is afterwards.
Tine: wow, that definitely takes it all off! You’re right, better be sure and remove everything! 🙂 But I have to admit that I’m too lazy to do all that in the evening..
Where do you substitute the others oil such as coconut oil in and are you suppose to do this everyday? I read somewhere else that you are supposed to do it twice a week. If so does that mean that you shouldn’t wash your face the other days? Thxs. Sorry for so many questions. I’m really interested in trying this.
Hi Ediotu and sorry for my late reply. You can use the Oil Cleansing Method if you want. I only do it every now and then for luck of time, but there’s nothing wrong in doing it daily unless you experience a negative reaction. In that case, it’s more than luckily that you’re using the wrong oils or the wrong concentrations for your skin type.
You can choose which oils you use. You can only use olive oil, or olive oil and castor oil, or castor oil and sunflower seed oil. Whatever suits your skin type best.
Hope this helped and let me know how it goes.
Wow, I can´t believe that this post is so old! I just started using the cleansing method about 3 weeks ago and am loving it! I think I have oily skin, but I use about 1/4 castor oil and 3/4 olive oil. I am starting to look at other oil options and oh my gosh… there is just too many. I cannot count how many hours I have spent looking at the different oils and their benefits. I recently bought baobab oil and apricot keernal oil. I haven´t used them yet, but both contain a ton of Vitamins (A, D, and E if I remember correctly) and baobab also has a lot of omega fatty oils. I´m thinking of going: 20% castor, 40% baobab, and 40% apricot. I´ll report back if anyone is interseted.
Barbara, yes, please report back. As you said, there are so many oils, and it’s really interesting to see how people combine them and what results they get from them. Is this new combo working better than the olive oil?
And yay, another OCM convert! 🙂
Back after a little over a month to report! So my new mixture (castor oil, baobab oil, and apricot kernal oil) took a little bit of mixing around. At first I used the % mentioned in my original comment and my skin felt dry. Apricot kernal is supposed to be more oleic out of the 3 so I increased that dosage: 20% castor, 30% baobab, and 50% apricot. Nope. I tried each 100% separately on different zones of my face. All felt the same (weird). Then I noticed that baobab “looked” more oily. So I did 50% that and 30% apricot kernal. No difference. Then I figured, maybe I should lower the % of castor oil and I think that worked. So now I´m using 42% baobab and 42% apricot and 16% castor.
I also wanted to add that I put baobab oil on a rash and on an eczema patch and in less than 24 hours it got all better!!!!
In conclusion, I think the olive oil was working better. But I obviously am not doing official controlled testing, plus the weather just changed to deep hot summer which may also play a part. Although I can say that with this new cleansing method, my face has not been as oily as it has in the last 33 years. So still a fan.
Thank you for the update. Glad it’s working for you. It takes a bit of experimenting to find the right mixture of oils, but when you finally find it, the results are amazing, aren’t they?
I’ve spent my whole life trying to scrub all the oil off my face – who knew that castor oil would be my friend in this instance. My skin is so soft and smooth and feels amazing. Thank you for the great information.
Deirdre, my pleasure. Glad to hear it’s working so well for you too. 🙂
Hi! I see a lot of bloggers write about hempseed oil for oil cleansing, and also a lot of mention of high-linolenic oils like safflower oils for acne-prone skin. Can you update with your thoughts on these, if you’ve checked them out? Thanks!
On a separate note, can you talk a little bit about fungal acne? I first learned about it here: https://simpleskincarescience.com/pityrosporum-folliculitis-treatment-malassezia-cure/
Esther, thanks for your suggestions. I’ve added both posts ideas to my editorial calendar so expect to see them on the blog soon. 🙂
Hi! Just discovered your blog and love it. Wanted to ask if i can use jojoba or almond oil to remove eye makeup. I’ve been using kalentoula oil as a night treatment and had great results wrinkle wise but it csuses watery eyes although i don’t apply close to eyes. Is generally safe to use oils as eye makeup removers?
Anastasia, yes it is both safe and effective to use these oils as makeup remover. Just wash your eyes with water if some of the oil gets into them.
Hi gio! I am one of your followers! Before i was so scared of paraben. But i was enlightened by your articles. I always look for the products paraben free and hypoallergenic. Before. I am suffering from fungal acne. And my face improve a little by following your articles and also f.c.’ S.s.c.s. and lian yo i am on my 2nd month now. Im using squalane as a moisturizer can i also use it for ocm? Thank you and God bless??
Mulan, thank you for your support, I appreciate it. So glad to hear your skin is improving. And yes, you can use Squalane for ocm. 🙂
I use the ocm usually find it wonderful especially coconut oil. Never had a breakout. Other oils are great as well. Love the Rosehip oil in the night time with a moisturizer.
Thelma, the OCM is wonderful, isn’t it?
I have acne-prone, oily skin and I am very careful what I use on my face because of it. I looked high and low for an oil cleanser that would suit my skin type but I couldn’t find one that didn’t have one or two objectionable ingredients. So I got myself some organic cold-pressed hemp seed oil and I started applying it to my face, massaging it in, rinsing, and then washing my face with a water-based cleanser. I’ve been double-cleansing this way for several months, and I am very happy with the results. Skin is nicely hydrated and less oily. In fact, the more I moisturize, the fewer breakouts I have, especially when I apply moisturizer after cleansing and before my actives. Washing with oil and moisturizing in this way has literally changed my life for the better!
Hi there,
I have a bunch of high-quality grapeseed oil and avocado oil at my house; would either of those be suitable for my skin?
I am 32, my skin is normal, slightly combination, some hormonal acne on the chin/under the jawline.
I don’t usually wear makeup though I do wear mineral sunscreen. I’m thinking I might be too lazy to oil cleanse every night, do you think two or three times a week would have helpful benefits?
Thank you!!
Megan, oil cleansing is good for skin, but you don’t have to do it if you don’t feel like this. You can just get a gentle, foaming cleanser and use that instead.